In the previous post, we have created a simple pipeline that fetches the wta_players.csv from HTTP (github) and stores it in our data lake. We are now going to build another pipeline, that fetches the ranking files.
Rankings Pipeline
Take a moment to explore the ranking files in github. As of the date of this post, there are 5 files. There is no naming pattern. The ranking files are: wta_rankings_00s.csv, wta_rankings_10s.csv, wta_rankings_80s.csv, wta_rankings_90s.csv, wta_rankings_current.csv.
Explore the files in raw view. Note that they do not contain headers on first row. We saw that this information is needed when defining the dataset.
Starting from the pipeline we have developed in the previous post, we will adapt it to copy the ranking csv’s. By the end of this post, we will learn to work with parameters, variables and loops.
Open Data Factory UI and let’s start implementing the pipeline to fetch the ranking files.
1. Copy pipeline
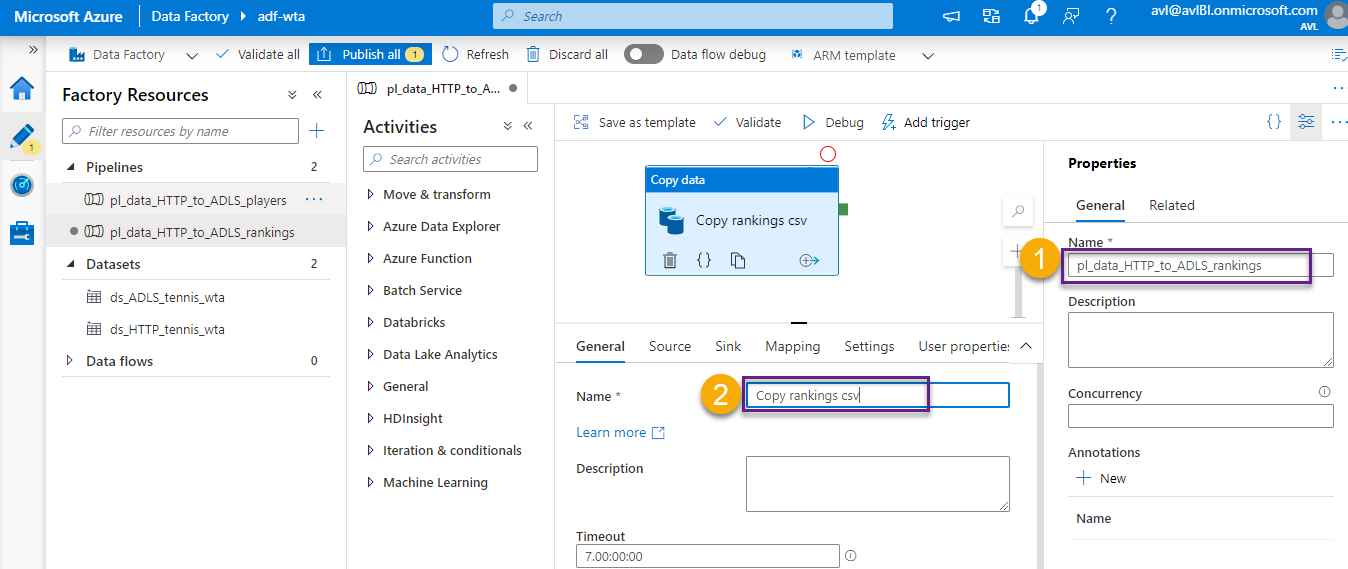
Clone the pl_data_HTTP_to_ADLS_players pipeline as shown in the image below, and name it pl_data_HTTP_to_ADLS_rankings. This will create a copy of the pipeline.
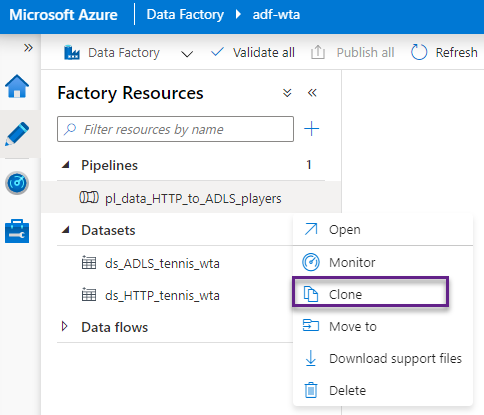
In the newly created pipeline, rename the copy data activity to Copy rankings csv.
2. Dataset Parameters: parametrizing the sink dataset
We will store the ranking files in the landing/rankings folder of the data lake. Let’s use a parameter for the folder path. In this way we can reuse the ADLS dataset, to store files in the designated folder, regardless of the type of file we want to store (players, rankings or matches).
We use parameters to pass external values. The parameter value cannot be changed during the pipeline run, it remains constant for the entire duration of the run.
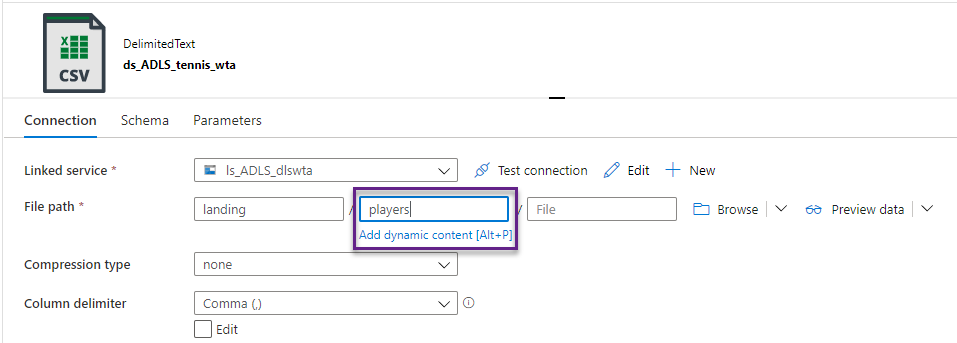
On the Sink section of the Copy data activity click Open to open the ds_ADLS_tennis_wta dataset.

On the Parameters section, click + New to add a new parameter of type String. Name it subfolder.

Switch to the Connection section. The file path is currently set to landing/players. Instead of hardcoding the subfolder to players or rankings, we will add a parameter. Select the field and click Add dynamic content.
In the Add dynamic content window, select the subfolder parameter we just created, from the Parameters list. Click Finish.

Note the prefix @dataset() for dataset parameters. We refer to a dataset parameter with the syntax @dataset().parameter_name.
The file path should now look like this:

3. Dataset Parameters: parametrizing the source dataset
Switch back to the pipeline and select the Copy data activity. From the Source section, click Open to open the ds_HTTP_tennis_wta dataset.

We want to automate the file copy process by passing the filename as a parameter to the dataset. We will update the ds_HTTP_tennis_wta dataset to accept the filename as parameter instead of hardcoded value.
In the Parameters section, click + New to add a new parameter. Name the parameter fileName.

In the Connection section, select Relative URL and click Add dynamic content. In the Add dynamic content window, choose the newly created parameter. Click Finish.
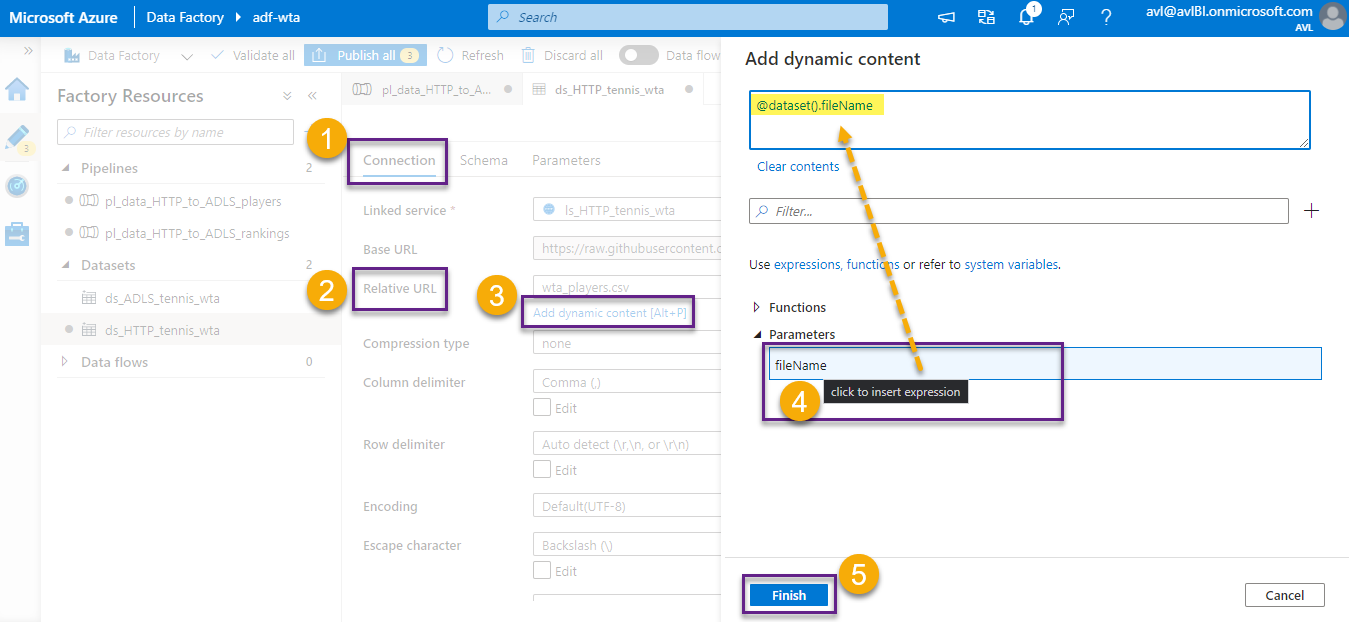
The parameter now appears on the Relative URL field. Switch back to the pipeline. Note that the fileName parameter appears under the Source dataset. We leave the Value field empty for now.

4. Pipeline parameters
Click on the white surface of the control flow, to unselect the Copy data activity. Note that the bottom panel changes. In the Parameters section we can add parameters to the pipeline itself. Click + New to add a new pipeline parameter.

Name the parameter fileNames. In the Type field, choose String. In the Default Value field add the filenames separated by coma:
wta_rankings_00s.csv,wta_rankings_10s.csv,wta_rankings_80s.csv,wta_rankings_90s.csv,wta_rankings_current.csv

Pipeline parameters have the syntax @pipeline().parameters.parameter_name.
5. Variables
The main difference between parameters and variables is that parameters are passed into the pipeline when triggered, whereas variables are set during runtime. Both can have default values and can be referenced in any dynamic content.
Variables are set at runtime, and unlike parameters, their value can change during the pipeline run.
Let’s add some logic to split the pipeline parameter fileNames into an array of strings. For that, we will add a pipeline variable.
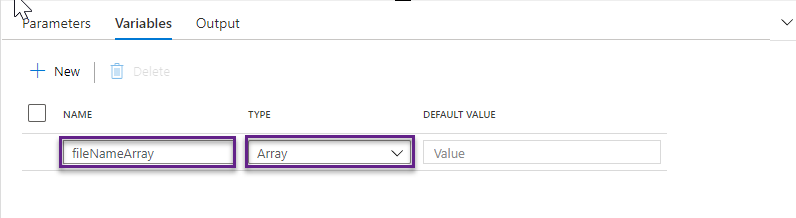
In the Variables section, add a variable named fileNameArray, of type Array.
Variables are referenced using the syntax @variables.variable_name.
Drag and drop a Set variable activity to the control flow and name it Set fileNameArray.

On the Variables section, choose the variable fileNameArray from the dropdown. Click to Add dynamic content in the Value field. In the Add dynamic content window build the following expression: @split(pipeline().parameters.fileNames,’,’)
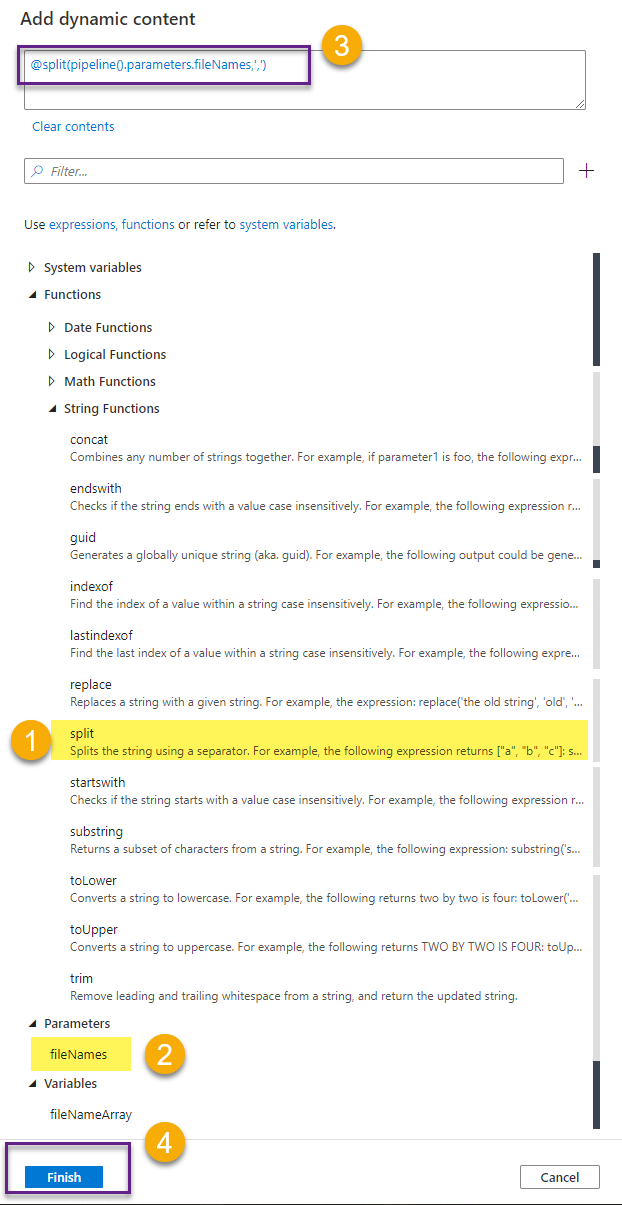
The split function will split the fileNames into an array of strings containing all file names. Internally, the result of the slit function looks like this:
[“wta_rankings_00s.csv”,”wta_rankings_10s.csv”,”wta_rankings_80s.csv”,”wta_rankings_90s.csv”,”wta_rankings_current.csv”]
This result is passed to our variable fileNameArray.
6. ForEach loop
We will use a ForEach loop to iterate through the items in the array.
The ForEach activity defines a repeating control flow in the pipeline. It is used to iterate over a collection and executes specified activities in a loop.
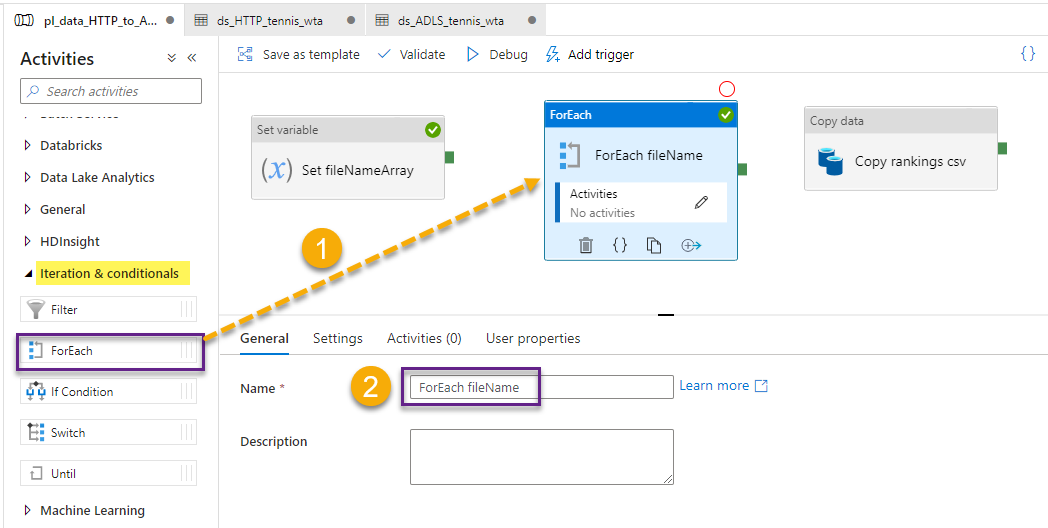
Locate ForEach activity under Iteration & conditionals and drag and drop it to the control flow area. Name the activity ForEach fileName.
In the Settings tab, click to add dynamic content to the Items field. Choose the variable fileNameArray.

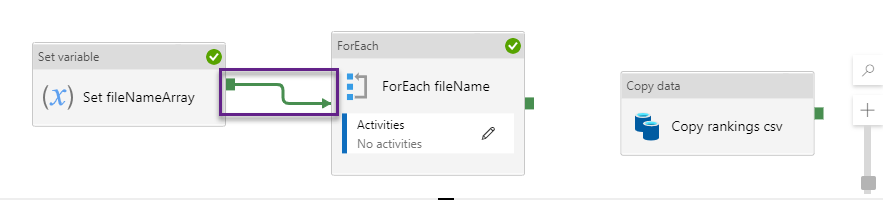
Connect the Set variable activity to the ForEach activity with a green (Success) arrow. The arrows specify the direction and condition of execution in the control flow.
This means that, when we run the pipeline, once the Set variable activity is executed with success, the ForEach loop activity can run and iterate through the fileNameArray, that was just set earlier in the control flow.
There are 4 types of connectors (arrows): Success, Failure, Completion and Skipped, corresponding to the possible outcomes of the activity run. Right click the arrow to choose between types. Default is Success.

We have instructed the ForEach loop to iterate through the items in fileNameArray. Next, we need to specify the activities we want to run for each item. In our case, we want to run the Copy rankings csv activity, to copy each ranking file. For that, we will need to “move” the copy activity “inside” the ForEach loop.
Select the Copy data activity and Ctrl+X to Cut. Then, click on the Configuration button to specify activities in the ForEach loop.

This will show an empty canvas. Ctrl+V to paste the Copy data activity here.
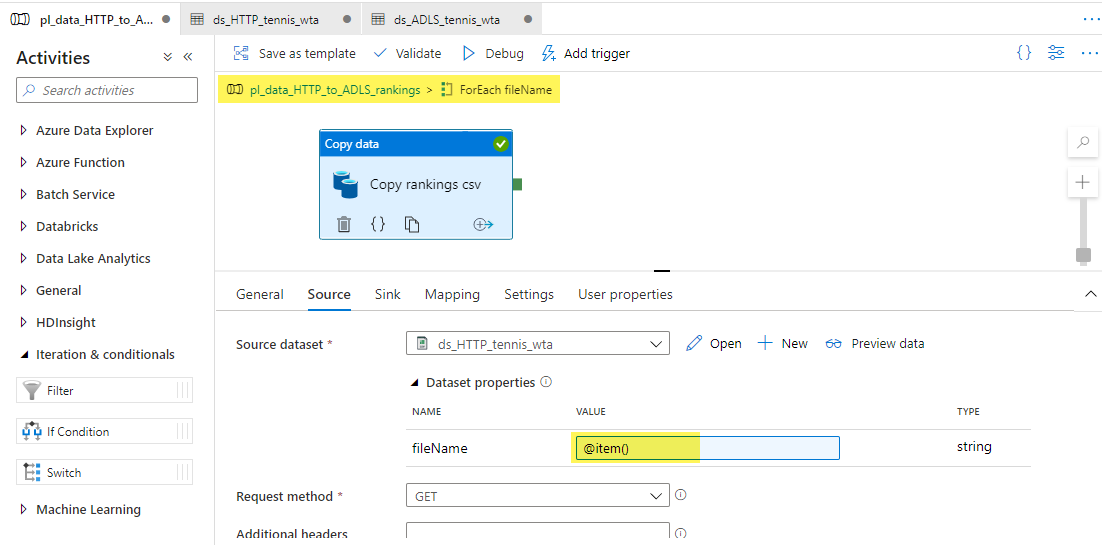
With each iteration of the ForEach loop, the current fileName is represented by the object item(). Let’s set the parameter fileName in the Source to item(). You do this by adding dynamic content, and selecting the current item of the ForEach iterator, as shown in the image below.

Your screen should look like this:
For the Sink dataset, set the subfolder parameter to rankings. Then switch back to the pipeline canvas.

Your screen should look like the image below. You can see there is one activity in the ForEach loop now.

7. Validate – Debug – Publish
We have come a long way and are now ready to run the pipeline. Validate first, then debug. Note that in Pipeline run window we have to specify parameters. The rankings pipeline has one parameter, the fileNames separated by comma. The default value is prefilled. Click OK to start debug.
In the Output window we can see the status of each activity. Note that the Copy rankings csv activity run 5 times. This is great, as we have 5 ranking files.

Before you Publish, head over to the players pipeline and set the parameters for the Source and Sink datasets! The fileName parameter should be set to players.csv, and the subfolder parameter to players.
Hit Publish all to persist all your changes.

Now you can also choose Add trigger > Trigger now to run the pipeline and check the details of the run in the Monitor tab.
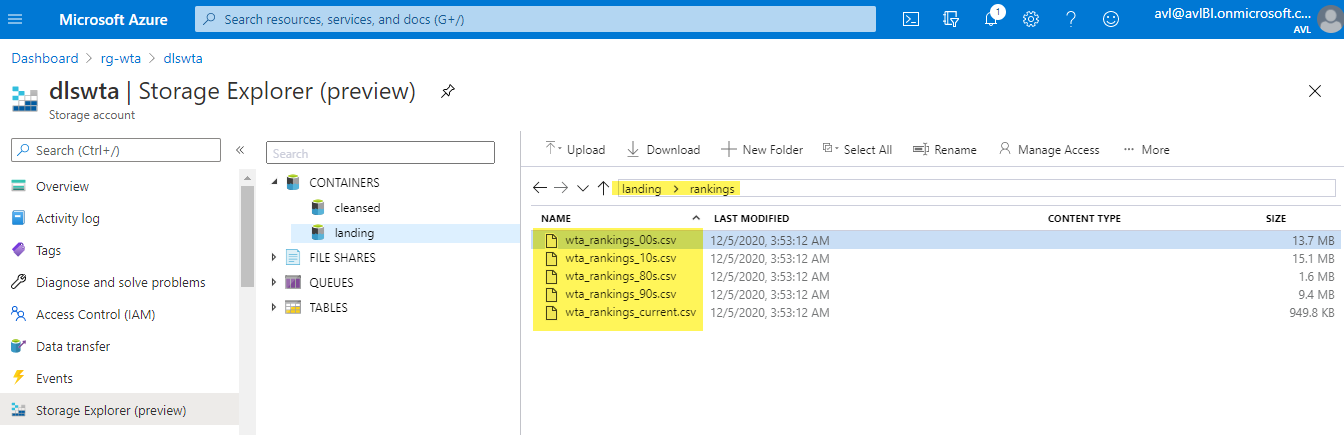
Just before we finish this post, head over to Azure Portal and check that the ranking files are now in the data lake. Find your way to the landing/rankings folder in your ADLS using Storage Explorer as described in the previous post.
What’s next
Well done! So far we have ingested the players and ranking files. In the next post we will build a third pipeline to copy the matches files!🐳
Want to read more?
Microsoft learning resources and documentation:
Set Variable Activity in Azure Data Factory
ForEach activity in Azure Data Factory
Branching and chaining activities in Azure Data Factory
